
Starting a YouTube channel can feel intimidating. Many beginners hesitate because they don’t want to appear on camera, don’t know how to write a script, feel uncomfortable recording their voice, or simply don’t know where to start with editing. On top of that, staying consistent week after week is hard even for experienced creators.
This is exactly why faceless YouTube channels have become such a popular option. You don’t need to show your face, and with the help of AI tools, several parts of the production process — like brainstorming ideas, drafting scripts, generating voiceovers, and creating visuals — can become noticeably easier.
If you’re wondering how to create a faceless YouTube channel using AI, this guide walks you through the entire process from start to finish. It won’t promise instant success or guaranteed views. Instead, it focuses on giving you a realistic, practical workflow you can actually follow.
It’s worth being upfront about something important: AI can speed up production, but it doesn’t guarantee growth, monetization, or a large audience. Channels that do well over time are the ones that combine AI assistance with genuine effort — useful content, an understanding of the audience, and consistent quality control.
By the end of this article, you’ll understand the full process of launching a faceless channel: choosing a direction, researching your audience, setting up your channel, finding topics, writing scripts, creating voiceovers and visuals, editing, designing thumbnails, publishing, and improving over time.
Quick Start: Create a Faceless YouTube Channel With AI
- Choose one clear audience and channel topic.
- Research what viewers are already searching for.
- Set up your channel and basic branding.
- Choose one video topic.
- Create an outline and script.
- Produce the voiceover and visuals.
- Edit the video and design the thumbnail.
- Upload, analyze performance, and improve the next video.
Tip: Start with one high-quality video instead of trying to automate your entire channel immediately.
What Is a Faceless YouTube Channel?
A faceless YouTube channel is simply a channel where the creator doesn’t appear on camera. Instead of filming themselves talking to the audience, the creator relies on other elements — narration, visuals, text, animation, or screen recordings — to deliver the content.
This approach opens the door to a wide range of formats, including:
- Educational videos
- Explainer videos
- Documentary-style videos
- Animation
- Screen recordings
- Tutorials
- Commentary videos
- Storytelling videos
Faceless doesn’t mean effortless, and it definitely doesn’t mean fully automated. A faceless channel still needs a clear topic, well-researched content, a script that makes sense, visuals that support the narration, and editing that keeps viewers engaged. The only thing that changes is that the creator’s face isn’t part of the video — everything else still requires real work and decision-making.
Can You Create a Faceless YouTube Channel Using AI?
Yes, AI can genuinely help with several stages of building a faceless channel. But it’s important to understand where AI is useful and where human judgment still matters.
AI can help with:
- Brainstorming topic ideas
- Assisting with research
- Creating script outlines
- Generating first drafts of scripts
- Producing voiceovers
- Generating or assisting with visuals
- Assisting with video editing
- Suggesting thumbnail concepts
- Writing metadata and descriptions
Humans still need to handle:
- Choosing a topic that’s actually useful to viewers
- Fact-checking information before it goes into a video
- Editing the script so it sounds natural and accurate
- Making creative decisions about tone, pacing, and structure
- Reviewing copyright and licensing considerations
- Making sure the content is original, not copied or recycled
- Maintaining overall quality across every video
AI can speed up production, but the creator is still responsible for the final content.
Keep that idea in mind as you go through the rest of this guide. AI is a production assistant, not a replacement for the decisions only you can make.
Step 1: Choose a Clear Channel Direction
One of the most common mistakes beginners make is uploading random videos on unrelated topics. One week it’s a tech review, the next it’s a history explainer, then a cooking tutorial. This makes it hard for viewers to know what to expect from your channel — and hard for YouTube to understand who to recommend your videos to.
Before you upload anything, take time to define:
- Target audience — who are you making videos for?
- Content topic — what subject area will you focus on?
- Video format — will you do explainers, tutorials, commentary, storytelling, or something else?
- Content style — will your tone be casual, formal, fast-paced, calm, or something in between?
For example, instead of creating random technology videos, a creator could focus specifically on simple AI tool tutorials for beginners. That narrower focus makes it easier to plan content, build an audience that knows what to expect, and eventually establish some authority in that space.
A Simple Channel Direction Formula
Target Audience + Topic + Video Format + Unique Angle
For example:
Beginners interested in AI + Simple AI tutorials + Screen-recorded explainers + Non-technical explanations
This guide won’t give you a big list of niche ideas — that’s covered in a separate article, Best Faceless YouTube Channel Ideas Using AI in 2026, if you want inspiration. Here, the focus is simply on defining your direction clearly before moving forward.
Step 2: Research Your Audience and Existing Channels
Once you have a general direction, the next step is understanding what your audience actually wants. This means researching:
- What viewers in your niche are searching for
- Common questions they have
- Popular video formats in your space
- Problems they’re trying to solve
- Channels that are already doing well in this area
A practical way to do this is to study successful videos in your niche and look for patterns, such as:
- Topic angle — how do they frame the subject?
- Video length — are videos short and punchy, or long and detailed?
- Thumbnail style — what visual approach do they use?
- Hook — how do they open the video to keep people watching?
- Structure — how is the video organized from start to finish?
The goal here is to understand what works, not to copy it. Recreating someone else’s script, structure, or thumbnail too closely isn’t just risky from a copyright standpoint — it also makes your channel forgettable. Use research to understand your audience and the competitive landscape, then bring your own angle to the content.
Simple Audience Research Workflow
Search for a topic your audience is interested in and study several relevant videos. Look for repeated questions in comments, gaps in existing videos, and topics that viewers still seem confused about. Use those observations to create a different or more useful angle rather than copying an existing video.
Step 3: Create Your YouTube Channel and Brand Basics
With a clear direction and some audience research behind you, it’s time to actually set up your channel. At this stage, keep things simple:
- Channel name — clear and easy to remember, ideally related to your topic
- Profile image — simple, recognizable, and consistent with your niche
- Banner — communicates what your channel is about at a glance
- Channel description — explains who the channel is for and what viewers can expect
- Content positioning — a short mental summary of what makes your channel different
For example, a beginner starting a channel around simple AI tutorials might build a brand identity entirely around “practical AI tips for non-technical beginners.” Every part of the channel — the name, the description, the visuals — would reinforce that one clear focus rather than trying to appeal to everyone.
Beginners often overthink branding at this stage. Simple and consistent is more useful than elaborate and confusing.
Keep Your Branding Consistent
Choose one simple visual style for your profile image, banner, thumbnails, and video graphics. You don’t need a complicated logo or professional design system when starting. What matters most is that viewers can quickly understand what your channel is about and recognize a consistent style over time.
Step 4: Find Video Topics Using AI and Audience Research
Now that your channel exists, you need actual video topics. This is one area where AI can genuinely save time by helping you brainstorm ideas based on audience problems and questions you’ve identified during research.
That said, not every AI-generated idea is worth making into a video. You should validate ideas against your audience research and real YouTube search behavior before committing to one.
A simple workflow looks like this:
Audience problem → Video topic ideas → Choose one clear angle → Create a video outline
Here are three example prompts you can adapt when brainstorming with an AI tool:
- “I run a YouTube channel about [your niche] for [your target audience]. Suggest 10 video topics that address common beginner questions in this area.”
- “Based on the topic ‘[specific topic]’, suggest 5 different angles I could take that would each make a distinct video.”
- “My audience struggles with [specific problem]. Suggest video topic ideas that directly address this problem in a practical way.”
Treat the output as a starting point, not a final list. Cross-check the ideas against what people are actually searching for on YouTube before choosing what to produce. You can also look at YouTube search suggestions, comments on relevant videos, and questions repeatedly asked by your target audience.
Step 5: Create a Video Outline Before Writing the Script
It’s tempting to jump straight from a topic idea to asking AI for a full script. But doing this too early often produces generic, surface-level content that doesn’t feel tailored to your audience.
A better approach is to build an outline first. A solid outline includes:
- Hook — how you’ll grab attention in the first few seconds
- Main points — the key ideas the video will cover
- Examples — specific illustrations that make each point concrete
- Transitions — how you’ll move smoothly from one section to the next
- Conclusion — how you’ll wrap up and what action you want viewers to take
For example, a short outline for a video titled “3 Simple Ways Beginners Can Use AI for Video Editing” might look like this:
- Hook: A quick statement about how editing used to take beginners hours
- Point 1: Using AI to remove filler words and dead space
- Point 2: Using AI to auto-generate captions
- Point 3: Using AI to suggest cuts or highlight-worthy moments
- Conclusion: A reminder that AI assists editing but doesn’t replace review
Make sure the outline matches your audience’s experience level. A beginner-focused channel shouldn’t casually reference advanced concepts without explaining them first. Once the outline is clear, you can use AI to help turn each section into a first draft without losing control of the video’s structure.
Step 6: Use AI to Create and Improve Your Video Script
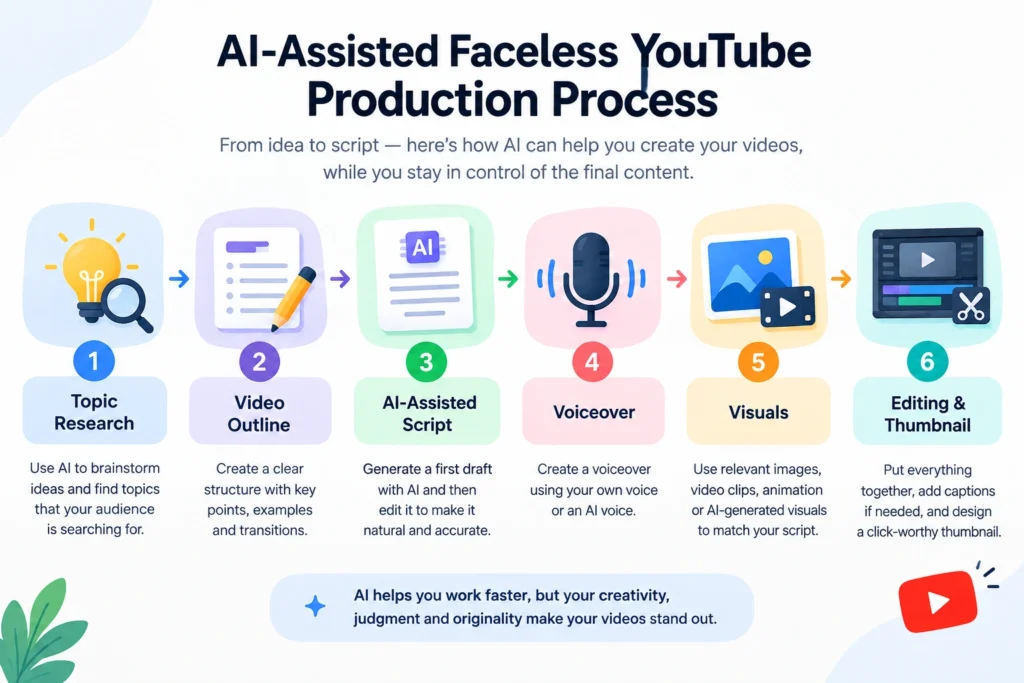
With an outline ready, AI can help generate a first draft of your script. This draft is a starting point, not a finished product.
Once you have a draft, your job is to:
- Edit generic or repetitive sentences
- Add original examples from your own knowledge or research
- Fact-check any claims, statistics, or specific details
- Remove unnecessary repetition
- Strengthen the hook so it actually grabs attention
- Adjust the language so it sounds natural when spoken aloud
A practical workflow for scripting looks like this:
Research → Outline → AI-assisted first draft → Human editing → Fact-checking → Final script
Here’s one example prompt you could use to improve a draft script:
“Here is a draft script for a YouTube video aimed at beginners. Please suggest edits to make the language more natural and conversational, tighten the introduction, and flag any sentences that sound repetitive.”
The goal isn’t to lean on any single AI writing tool as a crutch — it’s to use AI to speed up the first pass, then apply your own judgment and voice to the final version.
Step 7: Create the Voiceover
Once your script is finalized, you’ll need to turn it into narration. There are generally three options:
- Your own voice — recorded directly, which gives full control over tone and pacing
- AI voice — generated using text-to-speech tools, which can save significant time
- Professional voice actor — hired to record the narration for you
AI voice generation can be a practical option, especially for beginners who want to save time or aren’t comfortable recording themselves. However, quality still matters. Pay attention to natural pacing, correct pronunciation, and clear audio — viewers tend to disengage quickly from narration that sounds robotic, rushed, or poorly edited.
Which option makes the most sense depends on your channel format and audience expectations. A tutorial-style channel might tolerate an AI voice more easily than a storytelling channel that relies heavily on emotional delivery. Test a few options and listen back critically before committing to one for your whole channel.
Practical Example
For a beginner tutorial, you could create a short 30-second sample using your own voice and an AI-generated voice. Listen to both versions and compare clarity, pacing, pronunciation, and how well they match your channel’s style before producing a full video.
Step 8: Create Visuals for Your Faceless Videos
Visuals are what keep viewers watching when there’s no face on screen. You have several options to choose from, often combined within a single video:
- Original recordings you create yourself
- Screen recordings
- Licensed stock footage
- Images
- Animation
- Graphics
- AI-generated visuals
The most important principle here is that your visuals should support your narration, not just fill space. Do not simply place random stock footage over a script and call it finished — mismatched visuals make videos feel disconnected and can confuse or bore viewers.
Narration → Identify the visual needed → Choose or create the visual → Check whether it supports the point
For example, if your narration is explaining “how to set up an AI voice tool step by step,” a matching visual would be an actual screen recording of that process, not unrelated generic footage of someone typing on a laptop.
Whatever visual sources you use, make sure you understand and respect copyright and licensing requirements. Using footage, images, or music without proper rights can lead to copyright strikes or takedowns, even if you didn’t intend any harm.
Step 9: Edit the Video and Improve Viewer Experience
Editing is where everything comes together. Some core editing principles to keep in mind:
- Remove unnecessary pauses or dead air
- Match visuals with what’s being said at each moment
- Add captions when they improve accessibility or clarity
- Keep pacing appropriate for your topic and audience
- Use transitions carefully — too many can feel distracting
- Maintain clear, consistent audio levels throughout
AI-assisted editing tools can help with tasks like removing filler words, suggesting cuts, or generating captions automatically. These tools can save real time, but they shouldn’t replace a final review. Always watch your video through before publishing to catch awkward cuts, mismatched visuals, or audio issues an automated tool might miss.
A simple beginner workflow: rough cut first, add visuals and captions, review pacing, do a final audio check, then export.
Step 10: Create a Click-Worthy Thumbnail
Your thumbnail sets viewer expectations before they even click. A good thumbnail should:
- Clearly communicate what the video is about
- Be easy to understand even at a small size
- Avoid excessive or cluttered text
- Avoid misleading claims or exaggerated visuals
- Accurately match the actual content of the video
The goal isn’t simply to get a click. Your thumbnail should attract the right viewer and accurately represent what the video delivers.
There’s no guarantee that a particular thumbnail style will produce a high click-through rate — thumbnail performance depends on many factors, including your niche and audience. What you can control is clarity and honesty.
For example, instead of a busy thumbnail with five different text elements and arrows, a simpler concept — one clear image paired with a short, direct phrase — often communicates the topic more effectively at a glance.
Step 11: Upload and Optimize Your Video
Once your video is ready, it’s time to publish. Pay attention to:
- Video title — clear and descriptive, ideally including a relevant keyword
- Description — explains what the video covers and provides useful context
- Relevant keywords — help YouTube understand your video’s topic
- Thumbnail — uploaded alongside your title
- Chapters — helpful for longer videos so viewers can navigate easily
- Playlists — group related videos together for easier discovery
For the latest guidance on publishing and optimizing videos, you can review the official YouTube Creators resources.
Keep in mind that metadata alone doesn’t guarantee rankings or views. The most reliable approach is to accurately describe your video and help viewers quickly understand what they’ll get from watching — rather than trying to game search results.
Step 12: Build a Repeatable AI-Assisted YouTube Workflow
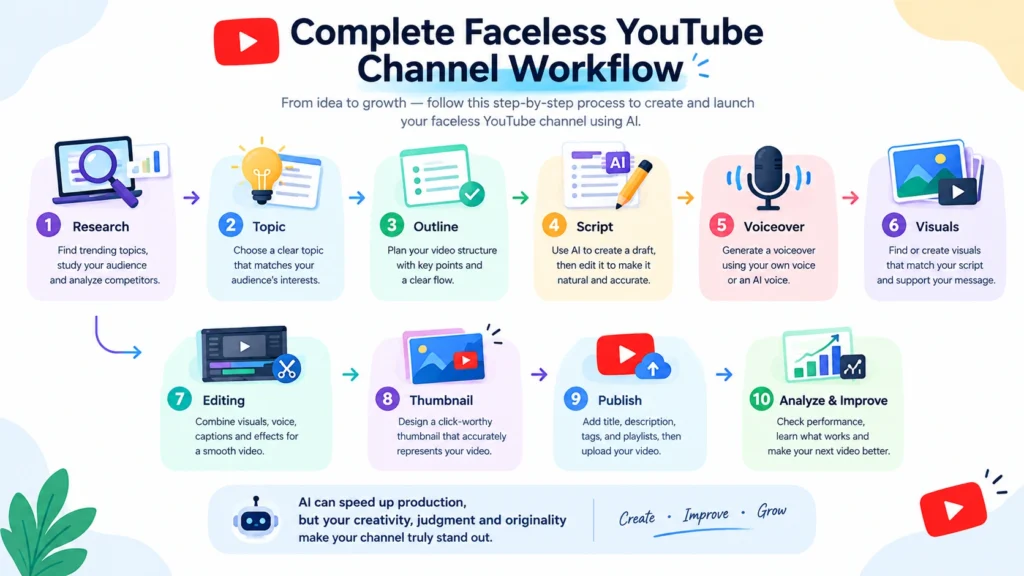
Once you’ve published a few videos, it’s worth stepping back and formalizing your process into a workflow you can repeat consistently:
Research → Topic Selection → Outline → Script → Voiceover → Visuals → Editing → Thumbnail → Upload → Analyze → Improve
You don’t need to use every AI tool available to make this work. In fact, trying to incorporate too many tools at once often slows beginners down. Start with a small number of tools that cover your biggest time drains — often scripting, voiceover, and editing — and get comfortable with that setup before adding anything new. If you’re looking for options, an article like Best AI Tools for YouTube Automation in 2026 can help you compare choices, and Best AI Tools for Content Creators in 2026 covers broader tools beyond YouTube specifically.
Your First Faceless YouTube Video Checklist
Before publishing your first video, check:
- Is the topic clear and useful for your target audience?
- Did you research and verify important information?
- Does the opening clearly explain why viewers should keep watching?
- Does the script sound natural when spoken aloud?
- Do the visuals support the narration?
- Have you checked copyright and licensing requirements?
- Is the audio clear and easy to understand?
- Does the thumbnail accurately represent the video?
- Does the title clearly describe what viewers will get?
- Have you watched the final video before publishing?
You don’t need your first video to be perfect. Focus on making it useful, reviewing it carefully, and learning what to improve in the next one.
Common Mistakes to Avoid When Using AI for Faceless YouTube Channels
- Publishing AI scripts without editing — unedited AI drafts often sound generic and can contain inaccuracies.
- Copying other creators — closely recreating someone else’s script or format can create ethical and legal problems.
- Using inaccurate information — publishing unverified claims damages trust with your audience.
- Using unrelated visuals — mismatched footage makes videos feel disjointed and harder to follow.
- Over-automating the channel — removing human judgment entirely often leads to low-quality, forgettable content.
- Ignoring copyright and licensing — using unlicensed footage, images, or music can lead to strikes or takedowns.
- Creating misleading thumbnails — thumbnails that don’t match the video content erode viewer trust.
- Uploading low-quality videos too frequently — consistency matters, but not at the expense of quality.
- Ignoring audience feedback — comments and watch data offer valuable signals for improving future videos.
Each of these mistakes tends to compound over time, making it harder to build a channel viewers trust and want to keep watching.
How Much of a Faceless YouTube Channel Can AI Actually Automate?
It’s reasonable to wonder just how much of this process AI can realistically take off your plate. The honest answer is: AI can meaningfully assist with repetitive, time-consuming tasks, but it can’t replace the human decisions that determine whether a channel actually succeeds.
AI can assist with:
- Brainstorming
- Drafting
- Voice generation
- Visual assistance
- Editing assistance
- Organization
Humans should control:
- Strategy
- Accuracy
- Originality
- Creative direction
- Quality control
- Final publishing decisions
Thinking of AI as a production assistant, rather than an autopilot for your entire channel, tends to lead to better long-term results.
Frequently Asked Questions
1. Can I start a faceless YouTube channel using AI? Yes. AI can help with tasks like brainstorming, scripting, voiceovers, and visuals, but you’ll still need to make creative and editorial decisions yourself.
2. Do I need expensive tools to start? Not necessarily. Many beginners start with a small number of tools and add more only as needed. Check each tool’s official website for current features and pricing before deciding what fits your budget.
3. Can I use an AI voice for YouTube videos? Yes, AI-generated voiceovers are commonly used on faceless channels. Focus on natural pacing and clear audio quality when choosing a voice tool.
4. Does YouTube allow AI-generated content? YouTube allows AI-assisted content when it follows the platform’s policies and requirements. Depending on how realistic or altered content is created, disclosure requirements may also apply. Review YouTube’s official policies and guidelines for the latest information before publishing.
5. How long does it take to create a faceless YouTube video? This varies widely depending on the topic, editing complexity, and your workflow. AI tools can shorten certain steps, but planning, review, and quality checks still take time.
6. Can beginners start a faceless YouTube channel? Yes. Faceless channels are often considered approachable for beginners because they remove the need to appear on camera, though they still require real effort in research, scripting, and editing.
Final Thoughts
Creating a faceless YouTube channel using AI is genuinely more approachable than manually handling every part of production yourself. AI can help you brainstorm topics, draft scripts, generate voiceovers, and speed up editing — but it’s only an assistant in the process, not a replacement for your judgment.
The strongest channels are the ones that combine AI-driven efficiency with original ideas, accurate information, creative decision-making, and consistent quality control. There’s no shortcut that removes the need for these things.
If you’re just getting started, don’t try to fully automate everything on day one. Focus on publishing one well-made video, learn from the process, and gradually refine your workflow as you go.
About the Author
Hi, We are the founders of EveryTechHub. We share beginner-friendly guides on AI tools, blogging, and technology based on hands-on testing and real experience. Read more about us.